Showing posts with label System Tools. Show all posts

Wednesday, May 26, 2010

How can I learn about the device information of my computer?

Sometime it is necessary to learn more information about the devices of the computer. But there are some people who do not know about the way of it. Suppose you want to know detail about the hard disk of your computer. Or you want to uninstall a device. Now what can you do? I know some people do not about it. And some people download software for do it. But if you can learn about any device or remove any device from the computer then, why you try to download software? Yes you can do it without installing any software. Because there is an application with your windows operating system which can be used for learn detail about any computer device (which device is already installed). Now the question is what is the name of this application? Yes! Device Manager is the name of this application. You can use it for get details of any device and for remove any device from the computer.

How to get details about a computer device?


First of all run the application of Device Manager. Right click on My Computer and select Manage. Then you can find the software of Computer Management will be run. Now click on Device Manager. Then you get a list of the devices of your computer on the right side of the program of Device Manager. You also can get more details about every device. For get more detail about any device right clicks on any device and select Properties.
Device Manager

How to uninstall a device from the computer


It is a wonder of joy that you also can remove any device from the computer by using this application. First of all right click on any device for uninstall it from the computer. And then select Uninstall. By doing this you can remove any device from the computer.
Hope all can understand about this post. Now inform me if you fail to understand any thing of this post. Thank you for see it.

Sunday, April 4, 2010

How can I Test my computer video drivers?

DirectX Diagnostic Tool

Sometime we say that I can not play any high
graphics able game and high graphics able video. It is the causes of the video drive. If our video drive is not well and if it is not high quality able then we face this problem. But if our device is not well then we can not do anything without changing it. But is not it good to know about the quality of our video device easily. Of course it is good. For that today I am talking about it. Know the question is how can I test my computer video drivers? Please see it for know this questions answer.

There is an application for test the video device of the computer. And it is no need to install or download it. Because you find it with the operating system. And the name of this program is DirectX Diagnostic Tool. Now the question is how can I run athis program? For run it first of all go to Start—Run and write down “DXDIAG” for run the program of DirectX Diagnostic Tool. Now click on the tab of Display. Then click on the button of Test DirectDraw for test the video drive of your computer. Then you can see a ball was running. If it runs fast then it proves that there is no problem of your video device. But if it is run slowly then it proves that there are some problems on your video device. Now click on the button of Test Direct3D for test the 3d device. After click on it you can see a 3D box will be dancing. By dancing fast it proves that there is no problem on your drive. And if does not work fast it proves that there are some problems on your video device. By doing this you can learn about your video device.

Hope all can understand what I want to say. Thank you for see it. If you fail to understand anything then inform me about it by giving comment I will try my most for solve it.

Wednesday, March 31, 2010

How can I see any small thing without using glass on my desktop?

There are many people who have no proper power on their eye. They use galas for see properly. And there are many things on the computer who is so small for see that they use glass. Not only the low eye power able people but also every people work hard for see very small letter and very small thing. For those people Microsoft Corporation make a utility tool. They can see any thing easily by using this tool.

windows magnifier

The name of this tool is Magnifier. It is no need to download it or install it. Because it automatically installed with the operating system. You can run it by many ways. I am saying a easy way to run it. For run it go to Start—Program Files—Accessories—Accessibility and then select Magnifier. By doing it you can run it. After that you can see any small thing easily on the top bar.

Hope all can understand what I want to say. Now please give your comment if it is useful. Thank you for see it.

Saturday, March 27, 2010

How can I remove the programs from startup?

There are many programs that are run automatically when the windows start. Those programs are called startup program. There are many valuable programs on startup and there are also some valueless programs on startup. Those valueless programs are sometime causes for hang and many problems of computer.

But now what how can you remove the valueless programs? Is it very hard? And my answer is it is not any hard work to remove those program form startup. And it is no need to use any specific software for the remove startup programs. Because there is a specific application with the operating system for remove the startup programs. And it is Microsoft System Configuration.

Now the question is how can I run the program of Microsoft System Configuration? And my answer is going to Start—Run and write down MSCONFIG after it press Enter. After that the program of Microsoft System Configuration will be opened. Now go to the tab of Startup. There you find those programs which are started with the windows. Now find the valueless programs.

Microsfot system configuration

Now the question is how can I find the valueless program? My answer is it is a little hard work to find the valueless program. After going the tab of startup you can see the full list of the programs. Here you also can see those programs’s path. Fist of all you take you mind that it is not good to remove any program form the path of C:/windows. Because if you remove any program of the directory of C:/windows then you may faces some problem. I think you can find those valueless programs by seeing the path of those programs.

Now the question is how to remove those programs. My answer is it is very easy. In the left side of every program name there is a check box. For remove those program form startup remove the right click form the check box.

Note: - It is not good to removes any programs form this list without know all about this program.

Monday, March 22, 2010

How can I close a program when it is causes for the hang of my computer?


you can see the performance of your computer by using task manager
Hi all. How are you? Hope all is well. Today I am talking about a very important event. Actually it is a solution of a problem. Everyone faces this problem sometime. For that today I am talking about it. Sometime you face the computer is become hang then you restart the computer by using the switch of restart. But it is not good to restart the computer by using switch.
You can understand properly about this problem and the solution of it by seeing an example. Suppose Photoshop, MS word software is being running on your computer. Now you give a command in Photoshop. At this moment your computer faces become hang. For that you can not work in Photoshop and MS Word. It is not possible to save the file of Photoshop but then you also can not save the file of MS Word. And it is not good to restart the computer without using any command. But you can make it possible to save the file of MS Word. Because this hang is created only Photoshop. So that at this moment by closing the software of Photoshop the computer again become free for work.


But that moment you can not work in Photoshop so that you can not close it. But you can close it by another process. You can close this software by using Task Manager. For run it presses Ctrl+Alt+Del. After that the program of Task Manager will be opened. Then go to the tab of Applications. Then you find the list of running program. Now for close the software right click on this software name and click on Go To Process. Now close this software by clicking on the button of End Process. After that this software will be closed.
I hope all can understand how to close a program when it is causes for the hang of the computer. I hope all can also makes the computer very free able by doing it. Thank you for see it. Now please inform me if you fall any problem to do it by giving comment.

How can I check the hard disk?


How can I check the hard disk?

Hi all. Hope all is well. In one of my post I was writing about check the hard disk by using DOS. Today I am writing about how to check the hard disk by using a tool. It is not so easy to check the hard disk by using DOS. But I hope everyone can check his hard disk by using the “Check Disk” tool. I think it is so easy to check a disk by using it because it is an object oriented tool. So it is no need to know any specific command for check the hard disk. So that everyone can check his hard disk regularly and it also made the computer faster. It is necessary to check the computer by using “Check Disk” tool or by using DOS command. It checks the hard disk error and solves those errors automatically. For that your computer becomes faster and safer.

Now I am talking the main thing and it is how to run “Check Disk” tool. For run it first of all goes to My Computer and open the properties of any drive for check this drive. For open properties it right clicks on the drive and selects “Properties”. Then you can find a dialogue box. Click on the “Tools” feature. And then click on the “Check now” command. Then the “Check Disk” tool will be opened. Now click

How can I check the hard disk?

on “Automatically fix file system errors” and “Scan for and attempt recovery of bad sectors” option buttons. Then click on “Start” button. After that you can see the process will be run. After sometime this process will be finished and it gives you a message (if you u`se Windows XP then it is not sure that it give you a message for alarming the process is finished).

I hope all can understand how to check the hard disk by using “Check Disk” tool. It is my advice to check the computer regularly. If you will be done it then you could get the best benefit thank you for see this post. If it is useful for you then please give your owner able comment.

Sunday, March 21, 2010

What is Registry Editor?

Registry Editor is a application program

Hi all. How days going? In my every post I am talking about any important event. Like those post today I am also talking about an important event. And it is about “Registry Editor”. First of all you need to know what is Registry. You can understand about it by seeing an example. Suppose you are working in a office. There you are working as a sell officer. Everyday 1000 products are supply you. Then you must to write down that who works for supply the products, who buy the products and by which amount of money. Because it is not possible to give the report without it. And in the computer Registry Editor write down everything and about every software and function. It means everything (hardware and software) in a computer is being written by it. There you find the records of program. Not only the records of programs but the function records of any program. Not only the software but also the information about every parts of hardware is written here.

You can see it and you also can change its value. But it is not good to change any value without the proper knowledge about the function. Because some time it makes many major problem. Suppose there is a function which is says that if the operator give the command of + then the software sum those numbers. And this functions value is true. Now if you change this then it gives you a wrong result. So it is my advice to not change any value without the proper knowledge about the function.

At this moment it is a question that how can find the record of a computer. You find all the record of a computer in the program of Registry Editor. For run it first of all clicks on Start button and click on Run. There write down “Regedit” and press enter. After that you can find the program of Registry Editor.

I will be talking more about it in another post. So keep your eyes on this blog. I hope all can understand what I am wanted to say. Thank you for see it. Now please give your own comment. If you can not understand any matter then write it I will try my best for solve it.

Tuesday, March 16, 2010

How can I change the window Background?


How can I change the window Background?
Hi all. Hope all is well. Today I am talking about a matter that is so important and it also gives your computer a nice looking. It is changing the window back color. You can change it by making an “.ini” file or by using the appearance tool. You can easily change the window background color by using it. For that first of all it is must to open the appearance tool. For open it. First of all right click on the desktop. If you use the operating system of Windows XP then select “Properties” after that you find Display properties tool. Then click on the feature of “Appearance”. Or if you use the operating system of Windows Vista then after right click on the desktop select Personalization. Then the Appearance Sittings folder will be opened

. Now open the “Appearance” tool. You can find this tool in the folder of Personalization. After run the “Appearance” clicks on the “Advanced” command button. Now click on the Item combo box. And select “Window”. Now select your wanted color. After select it click on Ok. And close the tool. After that open the “My Computer” or another folder than you can see the color is being changed. I hope all can understand how to change the window back ground color. I hope all ready you test it. If you fall any problem then inform me. I do my best to solve you problem. Thank you for see it. Now please give your own comment.

Sunday, March 14, 2010

How can I change the drive letter?


how can i change the drive letter
Hi all how are you? Today I am writing about an important event. And it is changing the drive letter without using any specific software. There is much software for changing the drive letter. Portable Paragon Partition Manager is the most famous software for this kind of work. But it is so difficult and risky. Today I am talking an application. You can change the drive letter easily and safely by using it. It is no need to install it or download it. It is a system application. It is automatically installed when you install the windows operating system. The name of this application is “Disk Management”.
how can i change the drive letter
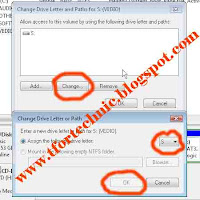
It is so easy to run it. For run it right clicks on My Computer and click on “Manage”. After that the program of Computer Management programs will be run. It is need to say first that Disk Management Application is a part of Computer Management. Now click on Disk Management. After that you find the program of Disk Management. Now select a drive for change its drive’s letter. And right click on it. After that click on “Change the drive letters and path….” Then a dialogue box will be opened. Here you can find a command box and its name is “Change”. Click on this command button. After that another dialogue box will be opened. Here you can find a combo box. Click on it and select you wanted drive letter name. And click on Ok. By doing this you can easily change any drive’s letter. Hope all can understand about process of changing the drive letter. Thank you too much for see this post. If this post is useful for you than please give your comment.

Saturday, March 13, 2010

How to Change Microsoft System Configuration#6

How to Change Microsoft System Configuration

In my last post I am talking about the feature of “Startup”. Today I am talking about the last feature of Microsoft System Configuration and it is “Tools”. In this feature you find those applications list which can be run easily buy you. Those application is called system application. If you want to run any programs form this list then first of all select the program and click on Lunch button. By doing it you can run any program form this list. You also can find the path of any program form there. You can see the path of the program which is being selected in the box of “Selected Command”. By going to this path you can find the program. Then you can manually open it. If you want to learn more about this feature or another feature then click on “Help” button. I hope all can understand what I am wanted to say. Thank you for see it. Now please give your owner able comment.

Friday, March 12, 2010

How to Change Microsoft System Configuration#5

How to Change Microsoft System Configuration

Hope all is well. Today I am talking about the 4th feature of Microsoft system configuration. First of all open “Microsoft System Configuration” and click on the feature of “Startup”. It is the 4th feature of “Microsoft System Configuration”. Actually it is a very important feature. Here you can find the list of those programs whose are being run automatically when you start the computer. Here you can find the name of those applications and their path. You can disable any application on your own wish. For disable any application removes the right click form the check box. You also can disable the all application by clicking disable all. Sometime for installing so many software which is automatically run when you open your computer. For that sometime you faces the computer is hanged. And your computer will be slow for this. So you can make fast by removing some programs. But always remember that some of those programs are related with the operating system. So do not disable all programs. Before disable any application you must be sure that it is related with your system or not. Today I am trying to give you a little knowledge about the feature of Startup. I hope all can understand about the feature of Startup. Now please give your owner able comment.

Tuesday, March 9, 2010

How to Change Microsoft System Configuration#4

How to Change Microsoft System Configuration

Hi all, by reading my last post you were learning about the feature of “Boot”. Today I am talking about the feature of “Services”. It is a very important feature. First of all run Microsoft System Configuration and go to “Services” feature. You can find many option buttons here. Actually those buttons are the list of programs whose are running. You must remember that there are many programs are always run but can not see the activities of those programs. Those programs are started when you start the windows. By go to “Service” feature you find the list of all services. Here you also can see the status of those entire programs. You can disable any services at boot time to troubleshoot which services might be contributing to boot problems. For show the third party application in the services list select “Hide all Microsoft services”. Clear the check box for disable a service on your next boot. If you have chosen Selective startup on the General tab, you must either choose Normal startup on the General tab or select the service’s check box to start it again at boot time. But always remember that if you are do not have much knowledge about those services then do not disable because some programs to malfunction or result in system instability. I hope all can understand what I am wanted to say. Thank for see it. Now please give your owner able comment in the comment box.

Sunday, March 7, 2010

How to Change Microsoft System Configuration#3

how to change Microsoft system configuration

In my last post I am talking about the first feature of Microsoft System Configuration. Today I am talking about the second feature of Microsoft System Configuration. The name of the second feature is “Boot”. There are many options in this feature. You can show here configuration options for the operating system and advanced debugging settings, including:


Safe boot:

Minimal: - Boots to the Windows graphical user interface (Windows Explorer) in safe mode running only critical system services. Networking is being disabled if you select it.

Alternate shell: - Boots to the Windows Command Prompt in safe mode running only critical system services. Networking and the graphical user interface are being disabled if you select this option.

Active Directory repair: - You can boot the Windows graphical user interface in safe mode running critical system services and Active Directory by select this option.

Network: - By selecting network you can boot the Windows graphical user interface in safe mode running only critical system services. But if select “Network” then networking is enabled.

No GUI boot:- If you do not want to display the Windows Splash Screen then you can select it. By select it you can avoid to see the windows splash screen by selecting “No GUI boot”.

Boot log: - You can boot the computer with storing all information from the boot process in the file %SystemRoot%Ntbtlog.txt by selecting “Boot log” option.

Base video: - You can boots to the Windows graphical user interface in minimal VGA mode by selecting it. Its load standard VGA drivers and instead of display drivers specific to the video hardware which is plug with the computer.

OS boot information: - if you select “OS boot information” then it shows driver names as drivers are being loaded during the boot process.

Make all settings permanent: - sometimes computer change those option automatically. By selecting “Make all settings permanent” you can make the changes permanent.

Hope all can understand about this feature. In my next post I am writing about the next feature of Microsoft System Configuration. Thank you for see it. Now please give your owner able comment.

Friday, March 5, 2010

How to Change Microsoft System Configuration#2

how to change Microsoft System configuration

Hi all. How are you? Hope all is well. In my last post I am talking about Microsoft System Configuration. In my last post I want to give a short description about Microsoft System Configuration, how to run it. In this post also I write about it. First of all you must know what is Microsoft System Configuration. For learn what is Microsoft System Configuration Click Here. Today I am writing about the first feature of Microsoft System Configuration. The name of the first feature of Microsoft System Configuration is “General”. Here you can find the sitting of Startup Selection. There are three options in this feature. The first option is “Normal Startup”, second option is “Diagnostic Startup” and third option is “Selective Startup”.

* Normal Startup: - Starts Windows in the usual manner. Use this mode to start Windows after you are done using the other two modes to troubleshoot the problem. If you have not much knowledge about this feature then select Normal Startup.

* Diagnostic Startup: - Starts Windows with basic services and drivers only. Diagnostic Startup mode can help rule out basic Windows files as the problem.

*

Selective Startup: - Starts Windows with basic services and drivers and the other services and startup programs that you select.

Today I am trying to give a short knowledge about the first feature of Microsoft System Configuration. In my next post I give another description about the second feature of Microsoft System Configuration. Thank you for show this post. Now please your owner able comment.

Thursday, March 4, 2010

How to change Microsoft System Configuration

How to change Microsoft System Configuration

Hi all how are you? Hope all is well. Today I am writing about an important event. But most of the computer operators do not know about this event. Every software and machine has a default configuration. The operators of those machines can change this configuration. But it is not good to change the configuration without the well known about those configurations. Like those machine your computer also has a default system configuration. You can change those configurations easily but it is not good to change the system configuration without the well known about those configurations. For change any configuration first of all you must know what is Microsoft system configuration, how to see the Microsoft system configuration. First of all I am talking about what is Microsoft system configuration. We use the operating system of Microsoft. It has a default configuration. By opening the “System Configuration” you can see the default configuration of Microsoft. You can open this application easily. First of all click on Start button, click on “Run”. After open the Run write down “MSCONFIG” now press enter or click on OK button. By doing this you can run the Microsoft System Configuration. Now you can see the configuration of Microsoft System. Now you can edit the configuration. But my advice is to not change the sitting of system configuration without the proper knowledge about those configurations. Today I am trying to give knowledge about the system configuration. I hope you all can understand about what is Microsoft System Configuration and how to run it. Thank you for see it. Now please give your owner able comment.

Tuesday, March 2, 2010

Defrag my computer without using any software#2

Hi all. How are you? Hope all is well. Today I am again want to talk about how to defrag a disk. I say about disk defragment in my past post. But there e talk about this too shortly. So I many people can not understand about it. So today I am again writing about it. That day I talk about disk defragmenting but that day I didn’t talk about disk analyzing. It is also an important feature of disk defragmenting. It is a part of disk defragmenting. It works automatically when we defrag our drive. After posting my last post about disk defragmenting I used in the operating system of vista. There I sow a difference. So today I also talk about disk defragmenting in vista. First of all I describe what is disk analyzing. It analyzes the disk and gives the report of the disk. You can show your hard disk’s error files, space and used files by using disk analyzing. I hope you can understand about disk analyzing. Now I am talking about disk defragmenting in vista. It is so easier to defrag the computer in vista. First of all start disk defragmenter. I said about how to start disk defragment in my last post. For see it Click Here. After run Disk Defragmenter click on “Defragment Now”. Now the process is started. By doing this kind of easy work you can defrag your computer. I hope you all can understand about disk defragment in vista and disk analyzing by reading this post. Thanks all for read it. Now please give your owner able comment.

Sunday, February 28, 2010

How can I delete temporary files form the computer?#2


how can i delete temporary files form computer

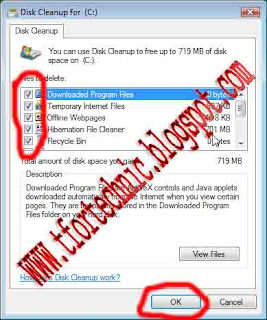
Hi all, what’s up. Hope all is well. In my previous post I am talking about how to delete temporary files manually. But today I want to give you the knowledge of deleting those files automatically. I hope everyone can understand about this. First of all you must learn about temporary file. In my previous post I am talking about it. If you do not sow it then click here at now. There is a tool in the computer who can automatically find the temporary files and who can delete those files easily without any difficulties. The name of the tools is “Disk Cleanup”. You can easily delete the temporary files form computer by using it. For run it first of all open “My Computer”, right click on any drive for remove the temporary files of it. Now click on “Properties” after that you can find a dialogue box. Click on “Disk Cleanup” after that you can find a new dialogue box. There are many option buttons on the dialogue box. Select all of those options. In the right side of those buttons you can see the size of those temporary files. After selecting all of those files click on “OK” button.

how can i delete the temporary files form the computer

By doing this you can remove the temporary files of your selected drive. By following this you can delete all of the temporary files form you computer. But remember that if you follow this then all of the files form “Recycle Bin” also be deleted. Because those files whose are also be identified as temporary files. I hope you can understand what I want to say. Thanks for see it. Now please give your owner able comment.

Friday, February 26, 2010

Get my lost files and undo the changes of my computer #4

how to undo the system restore

Hi, last three days you are watching about what is system restore, how to turn on the restore sitting, how to run the system restore application, how to create a restore point and how to restore the computer. But today I am talking about how to undo the restore. Suppose after restoring the computer you can guess that it faces some problem and you can not get your losses files but also loss some files. Or you get some virus files with those files. At this moment what do you do? There is also a function in system restore to solve this problem. And this function is called undo the restore. You can go back your past when you did not restore your computer by using this function. For using it you must open the application first. Then you can see a new option button. And it is “Undo my last restoration”. At past you could not see it. It can be seen after restore the computer. Now select it and click on Next button. By doing this you can undo the restore of your computer and you can solve the problem. I hope you can understand what I want to say. For get much knowledge show my last three posts. By showing this you can understand more. Thank you for seeing it. Now please give your owner able comment.

Get my lost files and undo the changes of my computer #3


how to restore the computer

Hi all how are you. I hope all is well. Today it is the third part of System Restore. In my previous post I said about what is system restore, why it is used, how to run the application of system restore and how to create a restore point. Today I am trying to give you a description about restoring the computer. It is the main function of system restoring. And by doing this you can get your lost system files. I hope you can understand about system restore by reading all past post of system restore. System restore is called restoring the computer in past. First of all run the system restore program. For learn about how to run the system restore program show the previous posts. For show the previous post click here.

After run the System Restore Program select the option of “Restore my computer to an earlier

how to restore the computer

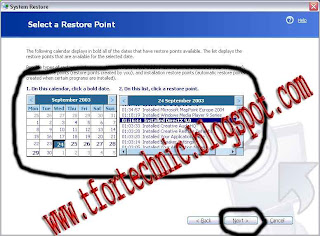
time”. Now click on “Next” button. After that you can find some restore points and the description of those points. Now select a system restore point. Selecting the system restore point is the main function. After select it clicks on “Next” button. After that your computer will restarted. And you system restoring is completed. After restart your computer you can get the lost system files and system changes. I think you can understand how to restore a computer. I am talking about how to undo the restore in my next post. Keep you eyes on this blog for see it. Thank you for see it. Please give you owner able comment.

Wednesday, February 24, 2010

Get my lost files and undo the changes of my computer #2


system restore

Hi all hope all is well. Today I am again talking about System Restore. If you don’t show my previous post then you can not understand much by reading this post. For read my previous post Click Here. In my previous post I am talking about what is system restore. Why you use it. It means in my previous post I want to introduce you with system restore. Today I am talking about the main program. It means which kind of work you can do by using system restore. The first of work system restore is creating a restore point. Second work is restoring the computer to an early time. Third work is undoing the restore. Today I am trying to give you the knowledge about creating a system restore point. I think you can understand this event by seeing an example. Suppose you are writing a text by using MS Word. After complete a part of the text you may save it. After that you again set for edit the text. But after sometime you think that after save it you don’t write down the right thing. For that you close the document and open the files which is saved at past by you. Creating a system restore is a same thing. Suppose you troubleshot your computer’s software. After troubleshooting it you think that this software is in a write place then you can create a restore point. For that in a future time you can go back this sitting. Suppose after creating the restore point you install some software which are the causes of your computer’s problem. Now you can go to the previous restore point. So it is an important event to create a restore point. Now I am talking how to create a system restore point. It is not a hard work. It is so easy to create a restore point. You can create a restore point by following this.

First of all open the System Restore application. I was talking about how to start System Restore

how to restore a system

in my previous post. After open it click on “Create a restore point”, click on “Next” now write down a description about this restore point. It helps you to understand about the restore point in future. Now click on “Create”. By doing this you can make a restore point. And you can use it in future. I will talking about how to restore the computer in my next post. Take your eyes on this blog for see the next post. Thank you for see it. Please give your owner able comment.